I’m the guy that didn’t heed the warning to never anchor by the stern. Sure, I’d heard the warning plenty of times, but nobody ever told me why. After all, it seemed so convenient, and that cleat on the port quarter was in the perfect spot. Oh yeah, this’ll be fine. Or so I thought. Fortunately I was one of the lucky ones and didn’t lose the boat.
I’ve since learned that anchoring by the stern has caused many boats – small boats especially – to capsize and sink. The reason is that the transom is usually squared off and has less freeboard than the bow. Plus the stern may be carrying the added weight of a motor, fuel tank, passengers and gear brought on board. In a strong current, that added weight and the force of the water could pull the stern under. Anchoring at the stern also makes the boat vulnerable to swamping by wave action.
Boaters make a lot of anchoring mistakes and it’s a matter of debate as to which occur most often. Just ask the guy who threw his anchor over the side without first attaching it to the line. Or the guy who fumbled the anchor and punched a hole in the bottom of his boat. Or the one that simply dropped it on his foot. All would agree that boat operators should be very careful when anchoring their boat.
I will argue that the most important thing to remember is never to anchor from the stern – although I must admit that tossing your anchor in the drink without first attaching it to the boat will make you feel pretty foolish.
That reminds me; keeping a spare anchor on board is not a bad idea either.
Easy Anchoring
Knowing how to anchor safely is an important seamanship skill that every boat operator needs to master. There are certainly going to be times when you’ll want to stop in a sheltered spot for swimming, fishing, lunch, or an overnight stay. But in bad weather, or if you experience engine failure, the only alternative to setting the anchor may be washing ashore or drifting out to sea. Anchoring is an easy task if you follow these guidelines:
1. Location: Choose an Area Clear of Boats and Underwater Obstacles.
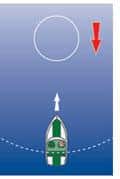
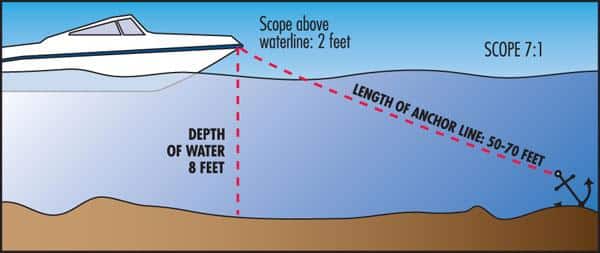
Decide on an area to drop anchor that is clear of other vessels and any obstacles. Be sure to check your chart to make sure there are no cables, wrecks or obstructions on the bottom to foul your line. Determine the water depth and type of bottom (preferably sand or mud). Calculate the amount of anchor line you will need to let out. The general rule is five to seven times as much line as the depth of water plus the distance from the surface of the water to where the anchor will attach to the bow. For example, if the water is eight feet deep and it is two feet from the surface of the water to your bow cleat, you would multiply 10 feet by 5 or 7 to get the amount of anchor line to put out. Secure your anchor to the bow cleat at the point on the line where you want it to stop. Then, with your boat heading into the wind (or current, if that is stronger) move into the area, put your engine in idle and bring your boat to a stop with the bow just forward of where you intend to drop anchor.
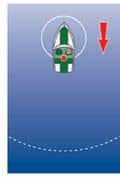
2. Lower the Anchor Slowly
With the vessel stopped and your life jacket on, lower the anchor slowly into the water from the bow. Do not throw it over the side as this tends to foul the line. As you lower the anchor, your boat should begin to drift backward with the wind or current, allowing the anchor to move down and away as it enters the water. This backward drift is important. If your boat is stationary when the anchor reaches bottom, the chain piling on top of it can prevent it from digging in. Therefore, if your boat is not drifting backward on its own, put the engine in reverse and move slowly backwards as you pay out the anchor rode. This stretches the chain out from the bow and ensures that the anchor will be lying on the bottom facing in the correct direction.
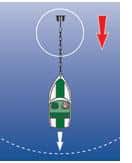
3. Keep Tension in the Anchor Rode
Keep tension on the anchor rode as you pay it out to keep the bow of the boat pointed toward the anchor. This ensures that your anchor, chain, and rope stay straight and don’t become tangled. If you’re anchoring in strong winds, you may actually have to put the engine in forward gear to control the speed and direction of backward drift.
4. Setting the Anchor
With the anchor rode out and the boat in the intended swing zone, secure the rode and let the anchor dig in and stop the boat. Exercise caution as you do this. Wrap the rode once or twice around a cleat and keep your hands well clear. Once you feel the anchor begin to dig in and set, put the engine in idle reverse and back down on the anchor to secure it to the bottom. This is especially important in areas where the bottom has a layer of sand and grass. Once the anchor is set, take note of any reference points (landmarks) in relation to the boat. Check these points frequently to make sure you’re not drifting.
5. Weighing Anchor
Once you’ve set the anchor, pulling it up or “weighing anchor” should be easy. Still, proceed with care and wear your life jacket during any anchoring evolution. The combination of anchor pull, current and weight can sometimes swamp a small boat. Lift the anchor as vertically as possible and be careful that it doesn’t hit the side of the boat. Wash the anchor of mud and debris as you lift it.
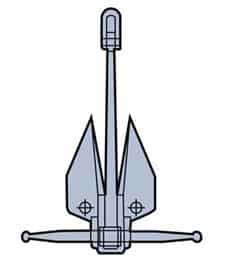
Know which anchor you’ll need…
There are anchors for every type of bottom and purpose: for rocks and heavy grasses, sand and mud, and for permanent moorings. When deciding which is right for your boat, consider the type and weight of your vessel, the average depth of the water, the strength of the wind and/or current, the diameter of the anchor line and, most important, the bottom characteristics in the area you are boating.
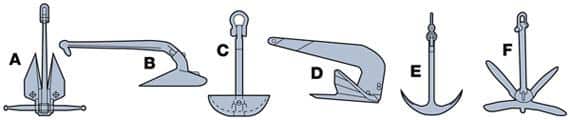
The Danforth anchor (A) is lightweight and holds well in mud and sand, as well as rocky bottoms, if set carefully. Many recreational boaters prefer the Plow anchor (B) because it demonstrates superior holding on most bottoms, including grass and weeds. The Plow does not hold well on rocky bottoms, however. The Mushroom anchor (C) buries well and holds best in sand or mud, but may be difficult to retrieve. It is often used for anchoring mooring buoys. The Bruce or claw anchor (D) was developed originally for offshore oil and gas drilling rigs. It’s a good burying type and holds well in sandy bottoms and mud. The Navy or Admiralty type (E) is an old reliable and familiar to most people, but can be awkward to stow on board. The Grapnel (F) is small and easy to stow, which makes it a frequent choice for small vessels and open boats. The flukes are not particularly strong, however.
….and how much line
The U.S. Coast Guard is asking all boat owners and operators to help reduce fatalities, injuries, property damage, and associated healthcare costs related to recreational boating accidents by taking personal responsibility for their own safety and the safety of their passengers. Essential steps include: wearing a life jacket at all times and requiring passengers to do the same; never boating under the influence (BUI); successfully completing a boating safety course; and getting a Vessel Safety Check (VSC) annually from local U.S. Coast Guard Auxiliary, United States Power Squadrons(r), or your state boating agency’s Vessel Examiners. The U.S. Coast Guard reminds all boaters to “Boat Responsibly!” For more tips on boating safety, visit www.uscgboating.org.


